© Paul Mozell
The fifth installment in a series. Your feedback is welcome! All photographs in the series are available as fine art prints and licensed stock images.
20) Don’t use auto White Balance for Landscapes

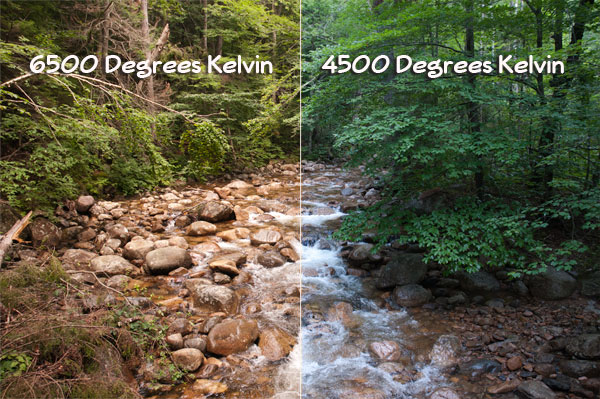
The Mad River, Waterville Valley, New Hampshire
The human eye is an amazing thing. It surpasses most, if not all cameras in its ability to see a range of brightness from dark to white and it instantly adjusts to different focal lengths faster than the finest Nikon, Canon lens. In collaboration with the brain, it makes remarkable adjustments for color temperature — a value on the Kelvin Scale that describes how cool blue, or warm red-yellow a light source may be. Your brain and eye can still sense the difference between the light of a cool shaded forest and the warm tones of sunset on the beach. Cameras make some decisions for you regarding white balance that may be undesirable. Our cameras think that daylight is somewhere between 5500° and 6000° Kelvin. Years ago I read that this value was a measurement of sunlight at high noon on the Summer Solstice as it occurs in Washington, D.C. This could be folklore, but it sounds nice!
All modern cameras have an auto white balance setting that attempts to neutralize or average, light sources to a value that is tinted neither cool blue, nor warm red. Most outdoor photographers seek out the golden light of early morning and early evening, when the sun’s rays beaming just above the horizon are bent toward the red wavelength. For whatever reason, our brains, or our belief systems, find this warm light very pleasing, and we’ll do just about anything to capture and authenticate this light in our photographs. Using the Auto White Balance setting wipes out this pleasing effect. When shooting in the cool, blue, forest, AWB also warms up everything. Get the idea?
My solution is to not use auto white balance when shooting most landscapes and nature subjects because I want the camera to record what I’m seeing with my eyes, preserving those subjectively pleasing color values. On my current Nikons, I dial in the white balance to 5880° and leave it there. Later, in my digital darkroom, I may play with the white balance in Adobe Photoshop or Adobe Lightroom. But I know that my starting point is always that same value. I am not suggesting that there isn’t a time and place for the judicious use of AWB such as in photojournalism, portrait and indoor photography. Rather, my approach for nature photography is to use the camera settings that render files that are as close as possible to what my eye and brain saw at the moment I opened the shutter.
21) Spotmeter for better exposures
Our cameras take so much of the hard work and the guess work, out of the chore of setting exposures. Yet, many images captured by even the most expensive and sophisticated cameras are under or over exposed. So often a very bright sky will fool a sophisticated metering system into under exposing. Similarly, dark trees or soil or a dark sky will get you an overexposed image. What to do? Use the Spotmeter or Center-Weighted setting and point the camera at a segment of the scene that appears to be in the middle range of brightness values. You’ll return home with a greater percentage of acceptable exposures.


I found this post really interesting! Thanks so much for sharing!